.png)
Make a task list
Tasklist displays a list of your tasks in a tree view. You can make as many lists as you like. When you first install the app, you won't have any lists, so you need to make one. Click on the New list button on the Tasks tab of the ribbon.
The app will show you a form to make a task list:
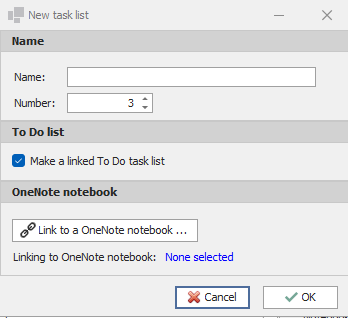
Type a name for the list in the Name edit box. Type a number if you like, or accept the default number.
If you leave this checkbox checked ![]() , the app will go online and make a new To Do list, which it will link to the list in the app, and after that it will keep the two lists synchronized. The app will give the To Do list the same name as the name you give your list here.
, the app will go online and make a new To Do list, which it will link to the list in the app, and after that it will keep the two lists synchronized. The app will give the To Do list the same name as the name you give your list here.
If you want to link your list to a One Note notebook, click on the ![]() button. This will bring up a list of your OneNote notebooks:
button. This will bring up a list of your OneNote notebooks:
.png)
You can choose one of these notebooks, or you can press the ![]() button, and make a new notebook to link to the list. Now, when you make a note from within the app, the app will post it to the linked notebook.
button, and make a new notebook to link to the list. Now, when you make a note from within the app, the app will post it to the linked notebook.